Raspberry Pi GPIO Input/Output in Javascript
One of the first hardware hacking examples a new RPi owner is encouraged to try out is turning on an LED via the RPi’s GPIO interface. The standard examples use the Python programming language, but its also possible to do everything you need to do on the RPi in Javascript.
The Raspberry Pi GPIO
The Raspberry Pi provides Input/Outport ports intended to control or monitor other devices and subsystem modules. These GPIO (general purpose I/O) signals on the 2×13 header pins on the RPi “motherboad” include SPI, I2C, serial UART, 3V3 and 5V power. These header pins need to be treated with care to avoid miswiring that could damage your RPi – a short-circuit will send you straight back to the shop for a new RPi. Although there’s also a 5v power signal available on one pin, take note that the I/O pins use a 3V3 logic level (3.3 volts) and are not tolerant of 5V levels, such as you might find on the 5V Arduino boards.
Most of the Raspberry Pi header pins are given the names of the pins of the Broadcom GPIO chip used (BCM2835). There isn’t even a logical relationship between the physical layout of the Raspberry Pi pin header and the GPIO chip’s pinout.
Setting up your Javascript environment – Installing NodeJS
Javascript was originally designed to run within a browser. To run Javascript applications from the command line, you will need to install Node on your Raspberry Pi. Follow the instructions in my previous how-to blog post here.
Comparison of NodeJS GPIO access packages
A number of Node library packages have been developed to control the RPi’s GPIO. Lets take a look at some of them. All these packages are offered under MIT licence.
pi-gpio
A simple node.js-based GPIO helper for the Raspberry Pi.
pi-gpio functions use the physical pin layout on the Raspberry PI header, not the Raspberry Pi or Broadcom GPIO I/O port numbers. That means you can physically connect a peripheral to a RPi header pin and control that pin directly by passing the pin number to the pi-gpio I/O function, without concerning yourself with what the GPIO port designation is for that pin.
See documentation at https://npmjs.org/package/pi-gpio
rpi-gpio
rpi-gpio has two key differences to the pi-gpio package:
- pi-gpio functions use the Raspberry Pi GPIO I/O port numbers rather than the physical pin numbers. That means if you physically connect a peripheral to the RPi header pin 11, you need to address it by its GPIO port designation 17. See here for the complete up-to-date guide to GPIO port to header pin mappings on the Raspberry Pi .
- All of the I/O functions of the rpi-gpio package are asynchronous, so where necessary – for example in reading the value of a pin – a callback must be provided. This package is thus more closely aligned with the asynchronous nature of the Node platform.
See documentation at https://npmjs.org/package/rpi-gpio
onoff
onoff is a package providing both synchonous and asynchronous GPIO I/O functions. Like rpi-gpio, it uses the GPIO port numbers as I/O function arguments.
In addition, onoff also adds interrupt detection, so that your callback function can be triggered automatically when the value of a GPIO port changes; avoiding the CPU load of polling it.
onoff provides a constructor function called Gpio which can be used to make Gpio objects corresponding to GPIO devices.
See documentation at https://npmjs.org/package/onoff
node-rpio
This is a module for NodeJS that is a wrapper for Chris Hager’s RPIO C library for the GPIO. It uses the underlying C libs unchanged.
Source code is available on github at https://github.com/brnt/node-rpio
How to handle the GPIO super-user privilege restriction
The Raspberry Pi’s GPIO pins require you to have root privileges to access them. That means any program you write that access the GPIO you’ll have to start as root user or using sudo. That’s totally unsafe, as your program then has carte blanche over your RPi and a bug in your program can cause carnage. To get around this problem, you can use the useful gpio-admin tool.
Do the following on your raspberry pi:
git clone git://github.com/quick2wire/quick2wire-gpio-admin.git
cd quick2wire-gpio-admin
make
sudo make install
sudo adduser $USER gpio
After this, you will need to logout and log back in.
Installing the Library
We can install any of the packages using the Node Package Manager npm. We’re going to install pi-gpio
cd back to your project directory and use npm to install pi-gpio in your project.
npm install pi-gpio
Hardware
Using a breadboard and connector wires, hook up the header pin 16 (GPIO port 23) to an LED with an appropriately-sized resistor in series.
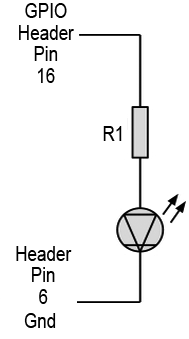 The value you select for R1 will depend on the current required by the LED (check the datasheet that came with your LED).
We also need to know from that datasheet the forward voltage required by the LED to light, typically around 2V-3.5V.
And we already know the output voltage of the RPi GPIO is 3.3V.
NB: the Raspberry Pi revision 1 and revision 2 hardware have slightly different pin layouts. The most reliable source of information on the RPi GPIO pin layout for your RPi is available on elinux.org here .
Using the Library
Lets build a test application to try out the pi-gpio functions. Using the nano editor, create a new source file called my_gpio_test.js
First we have to tell Node that it needs to load the GPIO package we installed.
var gpio = require("pi-gpio");
We’re going to blink the LED, so lets define some variables
var intervalId;
 var durationId;
 var gpioPin = 16;    // header pin 16 = GPIO port 23
Open a pin in output mode
// open pin 16 for output
//
gpio.open(gpioPin, "output", function(err) {
var on = 1;
console.log('GPIO pin '+gpioPin+' is open. toggling LED every 100 mS for 10s');
Blink the LED attached to this pin on and off every 100mS
intervalId = setInterval( function(){
  gpio.write(gpioPin, on, function() { // toggle pin between high (1) and low (0)
    on = (on + 1) % 2;
    });
  }, 100);
});
Let the blinking run for 10 seconds, then close port and exit
durationId= setTimeout( function(){
  clearInterval(intervalId);
  clearTimeout(durationId);
  console.log('10 seconds blinking completed');
  gpio.write(gpioPin, 0, function() { // turn off pin 16
    gpio.close(gpioPin); // then Close pin 16
    process.exit(0); // and terminate the program
  });
}, 10000); // duration in mS
Running a Test
Unless you have installed and run gpio-admin (see above), make sure you are running as root or with sudo, else the Raspberry Pi will not let you output to the GPIO.
sudo node my_gpio_test.js
You should see your LED blink for 10 seconds then see the program terminate naturally.
What Next ?
See other related Node Packages at npmjs.org
rasp2c – a nodeJS module for controlling the 2-wire i2c interface

Also check out https://github.com/brnt/node-rpio. It uses the same API as the Python RPIO library (also the same underlying C library). The one big advantage of node-rpio is that you can set initial values for the GPIO pins when initializing them in your code. This in invaluable if you’re doing anything where you don’t want the GPIO flipping on-off or off-on quickly during initialization (which is bad if you’re controlling irrigation valves, for example).
A useful addition, thanks for the tip!
You may want to look into http://thomashunter.name/blog/gracefully-kill-node-js-app-from-ctrl-c/. Gracefull and robust exit should be a common practice.
Yep. nice one.
How about https://github.com/EnotionZ/GpiO ? The pi-gpio library is currently unmaintained.
Just started working on RPi tonight and this is a pretty straight forward article! Thx!
By far the best tutorial in this section.
I´m trying to run this in an electron application and it just don´t run on rasperry pi.
Without electron it runs nicely.
In os-x i got the message:
Uncaught Error: ENOENT: no such file or directory, open ‘/proc/cpuinfo’
On the rasperry it says:
the module cannot be found
Any suggestions?
Thanks for reply