A Node.JS Application on the Amazon Cloud. Part 1: Installing Node on an EC2 instance
In this three-part exercise, we’re going to build a web application using Javascript on both the client and server side, using Amazon Web Services (AWS) cloud-hosting infrastructure and the Node.JS framework.


What we’re going to do first is install Node on an Elastic Cloud Computing (EC2) virtual server instance provided by Amazon Web Services. In the following parts of this series, we’ll add a MongoDB database instance, and develop a simple server-side web application in Javascript using the Express framework and the Mongoose library for accessing our database.
Why use Javascript for a Server-side Application?
Node is the increasingly popular backend framework for building single-page web apps. On top of providing the advantage of an asynchronous (event-based) programming model on the backend, it means I can code in Javascript on both the frontend and the backend again – just like in the good old days, coding client-server applications in C.
Our Requirements
There are limitless options for building a web application server on AWS, but lets define some basic requirements :
- Eligible for/compatible with the “AWS Free Usage Tier”
- Runs on Amazon Linux (the Amazon Linux images seem to be better optimized for EC2)
- Install Node.JS support with npm and the Express, Socket.io, and Mongoose packages
- Install MongoDB
- Use Git-based deployment of our code to AWS
- Implement a webserver application using the Node & Express framework we install

Apps I use on my Mac for local development and managing AWS
Your AWS account and server instances are of course managed entirely online, but there are a few applications you will need on your Mac to develop and deploy applications to AWS.
Aptana Studio
I like to use the same IDE for coding and managing projects, whatever programming language I’m using. Aptana is a pretty universal open IDE that integrates well with Git for source control and Firefox for debugging & testing.
Sublime Text 2
An editor i sometimes use for coding when an IDE is overkill.
vSSH
vSSH is a customizable SSH and Telnet client with macros and keys sharing. I use this app on my Mac and iPad to remotely log into my AWS instances. Get it from the Mac App Store here
Using Git to deploy my application to the server
I develop my applications locally using Aptana Studio, and use Git for version control.
I also deploy the application to the production server (my EC2 instance) using git, giving me the ability to roll back to previous versions when I break something.
The workflow is simply:
On my Mac:
cd myapp
# make changes ...
git commit
git push
then when I’m ready to deploy to the server, I log into the AWS instance using vSSH and clone the git repository there
mkdir myapp
cd myapp
git clone https://github.com:/my_name/path_to_myapp_repository
git pull
to checkout the latest version from the repository on github, then
node app.js
to start the Node server and run my application
Getting started with EC2
Let’s start by creating an account at Amazon Web Services.
Visit https://aws-portal.amazon.com/gp/aws/developer/registration/index.html and log in or create an account.
When you have created your account, open the AWS Management Console — a simple-to-use web interface for starting and managing your virtual servers.
In order to install and run Node, we first need to set up our first virtual server to install it onto.
Amazon calls its virtual servers instances. For now, you only need one instance. An EC2 instance is similar to a regular unmanaged web-server.
Here’s how we create our first instance on AWS:
1. Select EC2 (Amazon’s Elastic Compute Cloud) from the list of services AWS provides
2. In the menu bar you find an item labelled “Region”. Click it to switch to your nearest or chosen region where you want to locate your server. The cost varies between locations (although it’s free for the first year).
Now give your instance a name.
Type a name for your key pair file, e.g. “myhosts” and download it to your Mac.
Your key file must not be publicly viewable for SSH to work. So open a terminal window on your Mac and use this command to restrict access rights to the file :
chmod 400 myhosts.pem
Then choose an AMI (Amazon Machine Image) for your server. I use Amazon Linux 64 bit, which is tuned for security and performance in the cloud. I chose 64bit due to reported compatibility issues between the 32bit version and some versions of Node.

There are other Linux AMIs that you can use, which have Node and other software pre-installed, which you may use as a short-cut later. But for our purposes, if you start with a clean installation and configure everything yourself, you’ll be able to better understand how to administer and maintain your instances in future.
Your instance is now launching and that may take a few minutes. Click the View your instances on the Instances page link and you will be redirected to your “My Instances” page, where you can monitor and configure all your EC2 instances:

You can now use your instance’s public dns to connect to your server via ssh. Amazon does not provide a custom username and password for ssh connections. Instead, they use the key pair file you created a couple of steps ago (a more secure method of authentication).
Connect to Amazon EC2 with vSSH
Configure your security private key
OpenPreferences, navigate to the Security tab. click + and open the .pem file you saved earlier.
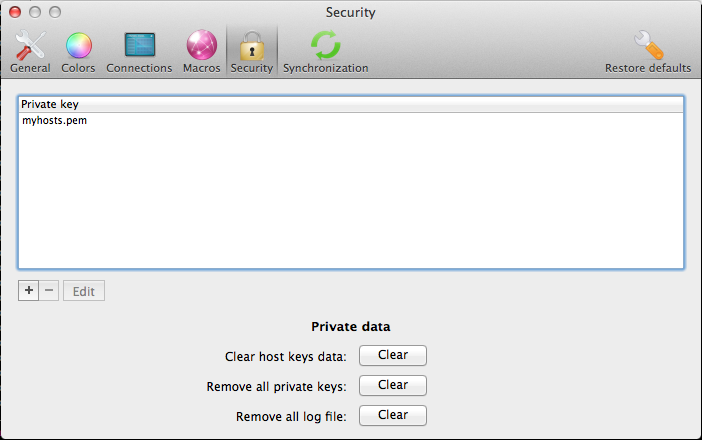
Once this is added, close the preferences window.
Connect with vSSH
Enter your instance’s public DNS address shown in the EC2 console in the Host Name field. in the Private Key field, select the myhosts.pem key file in the drop down box
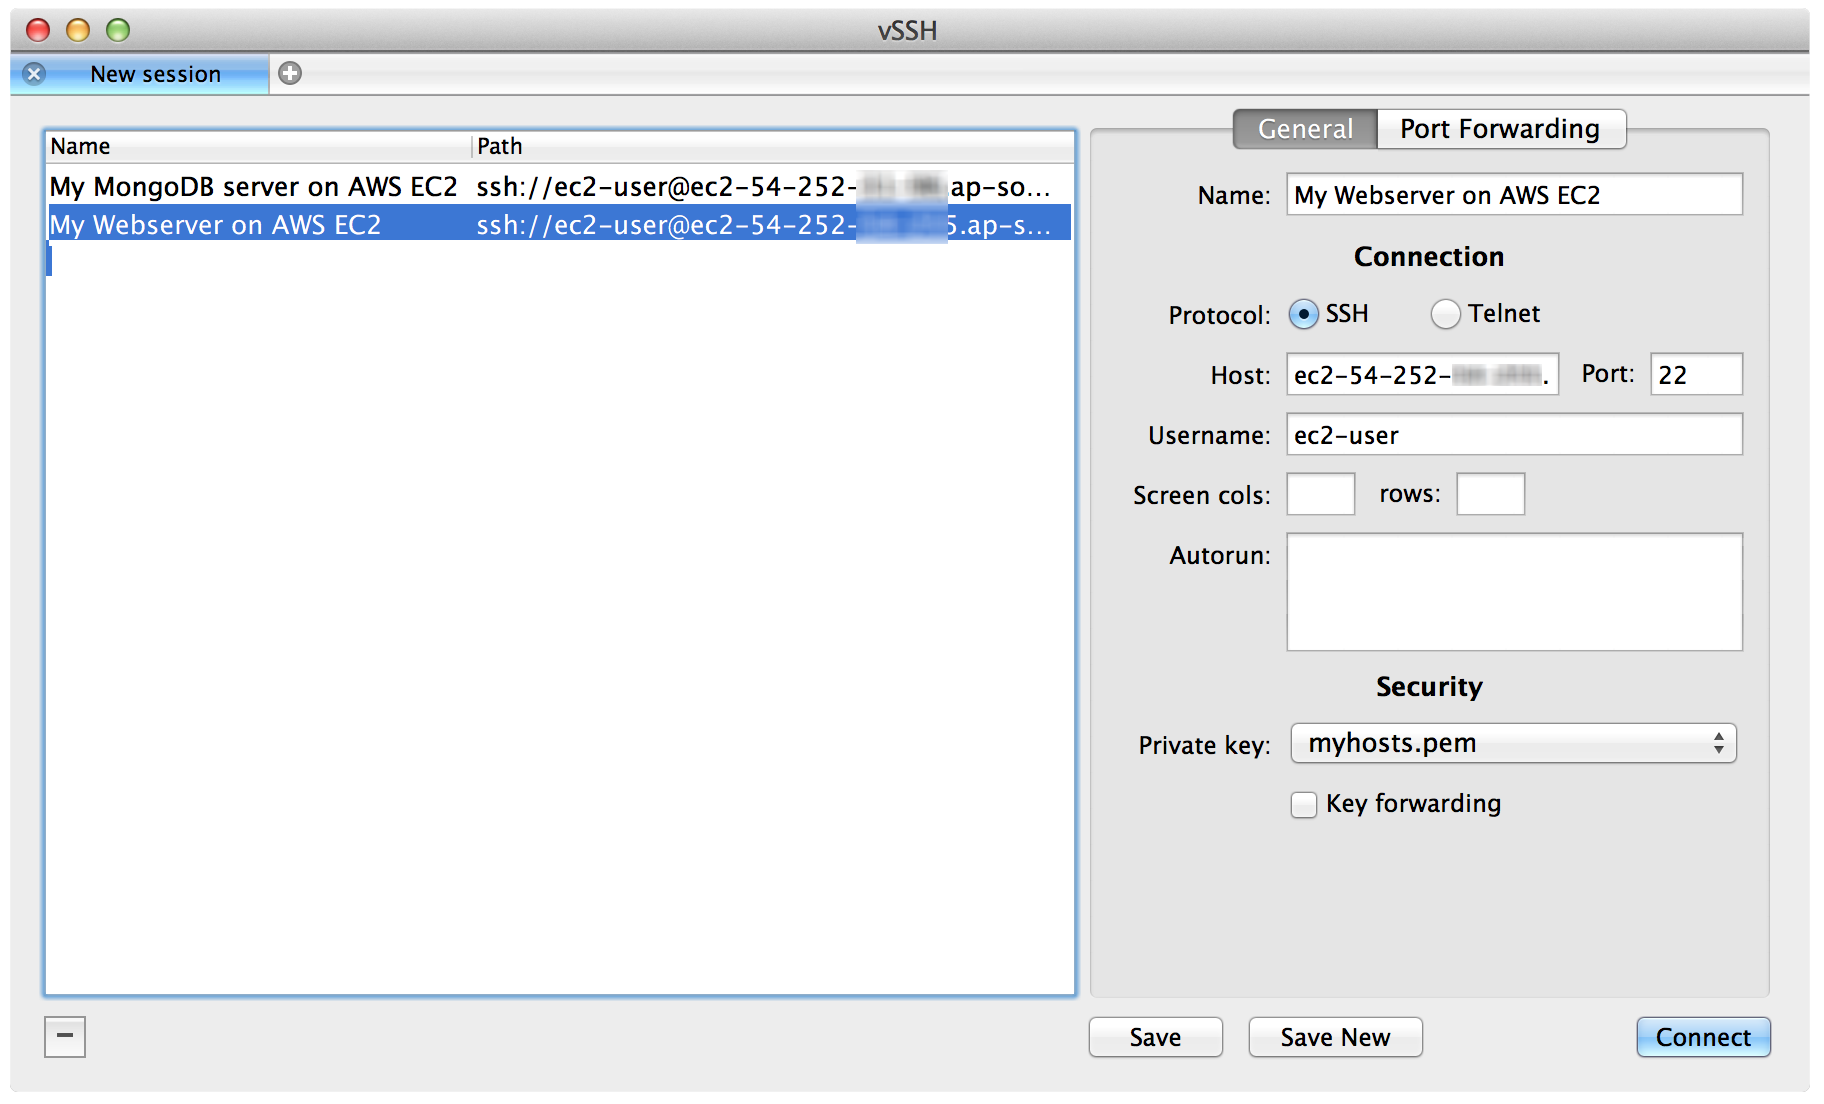
select Connect
the terminal window will appear. if asked to log in, enter ‘ec2-user’ You are now logged-in into your instance!
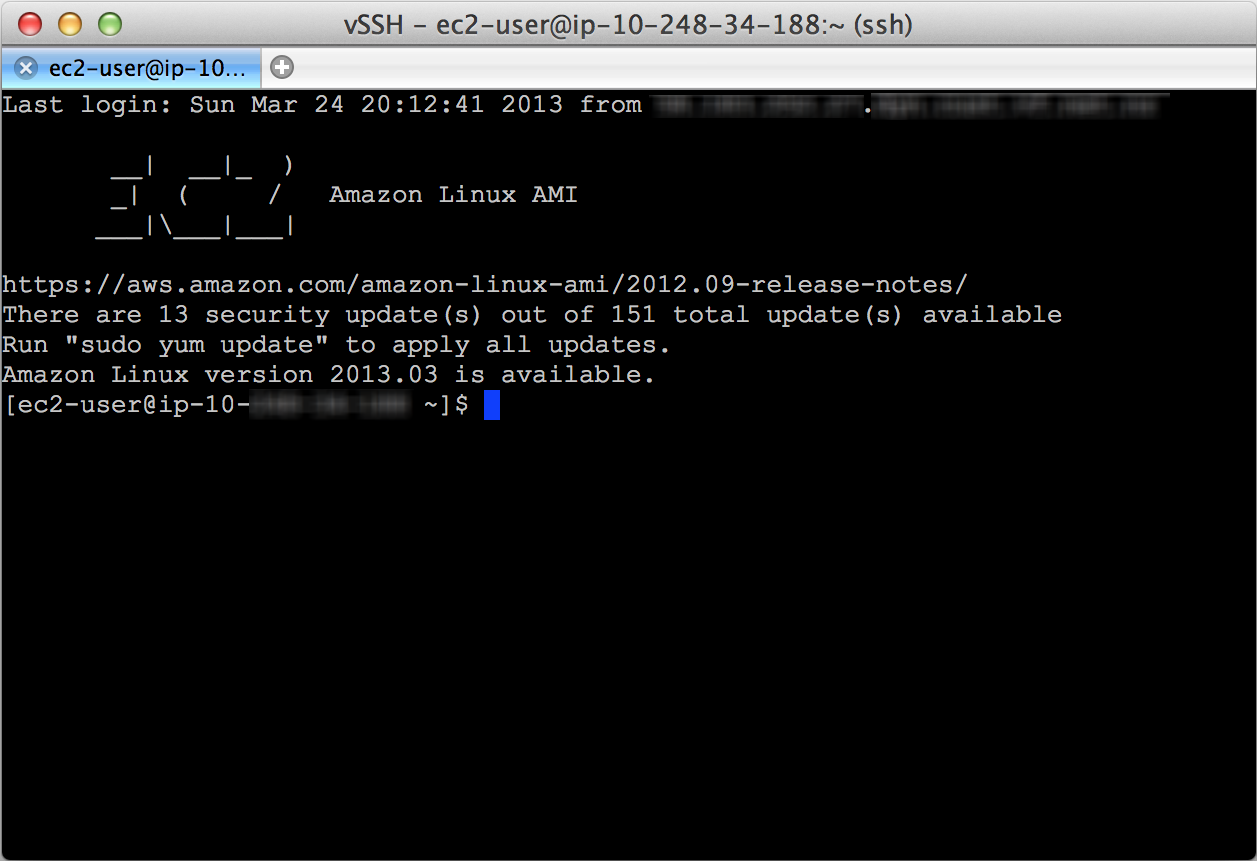
Update your EC2 Amazon Linux
Security updates are automatically applied on the initial boot of the AMI. Upon login, the Message of the Day (/etc/motd) indicates whether or not any additional updates are available.
The Amazon Linux distribution uses the yum configuration manager.
To install updates, enter :
sudo yum update
Type y when prompted if this is ok and wait a few minutes for the updates to install.
Install Node.js and NPM on your server
At last, it’s time to install Node.js on your Amazon Linux server! We are going to install some required packages to compile Node and get Node from its Github repo. Type the following:
sudo yum install gcc-c++ make
sudo yum install openssl-devel
sudo yum install git
git clone git://github.com/joyent/node.git
cd node
Now you need to decide which version of Node you want to install. You can view all available Node tags (versions) by typing git tag -l. The make command will take a while to complete (30+ minutes), so go make a coffee and come back later.
git checkout v0.8.1
./configure
make
sudo make install
OK, Node is now installed!
Let’s add it to sudo’s path so that we can install more packages. You will need to edit the /etc/sudoers file.
sudo vi /etc/sudoers
find this line:
Defaults secure_path = /sbin:/bin:/usr/sbin:/usr/bin
move the cursor to the end of the line and hit the insert button to append the text
:/usr/local/bin
exit insert mode, save your changes and exit VI, by hitting ESC and typing :w!
The next step is to install NPM (the Node package manager).
Type the following commands:
git clone https://github.com/isaacs/npm.git
cd npm
sudo make install
Congratulations
You now have a working Amazon EC2 instance with Node.js and NPM, and you’re ready to install any additional Node library packages you need !
Installing Node library packages
You can install additional Node packages using NPM like this :
sudo npm install express -g
sudo npm install socket.io -g
Open Ports
go to security Groups on your AWS EC2 dashboard.
Add new inbound rules for the security route :
- All ICMP (to allow you to ping your server), and
- custom 8080 (if thats the port your web server will be using)
- for IP address, just use 0.0.0.0/0 to allow access from all IP-addresses
End of Part 1
I hope this guide was useful. If you have any comments, suggestions or additional tips that could be added to the guide, please let me know in the comment section below.
Go on to Part 2 – Adding a Database
Related Posts
AWS SDK for Node.js – The SDK helps take the complexity out of coding by providing JavaScript objects for AWS services including Amazon S3, Amazon EC2, DynamoDB, and Amazon SWF. See http://aws.amazon.com/sdkfornodejs/ and the Getting Started guide here
http://docs.aws.amazon.com/nodejs/latest/dg/nodejs-dg-aws-sdk-for-node.js.html
Next, in Part 2 of the series, we’ll add a database

when entering this line – sudo yum install gcc-c++ make
I get an error saying “no package gcc-c++ available”
At this moment I’m at ‘sudo make install’. I have no idea what happened, it all looks magic and matrix to me… If it works though, then thanks man! 🙂
Thanks a lot for this article. Its been very helpful.
I know it is almost a year old but I felt I should mention that your left your IP address in the screenshot (located in title bar of terminal window). Other than that, thanks for this article! It was was easy to follow for a primarily front-end developer like myself!
It is really a good article. But want to understand How should i access my application now. I am trying with http://public-dns-name/nodeAppName. But not getting anything. Might be silly, but doing first time…
Thanks for the post. When I try to run npm install it times out. Which port is used by npm? It seems like I need to open that port manually.
Thanks … I just put up an instance straight on AWS (wordpress, etc) and wasn’t sure how the git workflow worked best … puts a little pressure to keep code tidy or else suck it up and pay for a private git. That diagram was perfect.
Kevin
nice
wow, i cannot believe i just built a node server that quickly. i feel incredibly cleaver but i just followed directions. well done my man
-Bill
Getting an Error 2 on the final sudo make install part:
[ec2-user@ip-172-31-7-102 npm]$ sudo make install
scripts/doc-build.sh doc/api/npm-start.md man/man3/npm-start.3
make[1]: Entering directory `/home/ec2-user/node/npm’
node cli.js install marked-man –no-global
util.js:538
ctor.prototype = Object.create(superCtor.prototype, {
^
TypeError: Cannot read property ‘prototype’ of undefined
at Object.exports.inherits (util.js:538:43)
at Object. (/home/ec2-user/node/npm/node_modules/npmlog/node_modules/are-we-there-yet/index.js:115:6)
at Module._compile (module.js:449:26)
at Object.Module._extensions..js (module.js:467:10)
at Module.load (module.js:356:32)
at Function.Module._load (module.js:312:12)
at Module.require (module.js:362:17)
at require (module.js:378:17)
at Object. (/home/ec2-user/node/npm/node_modules/npmlog/log.js:2:16)
at Module._compile (module.js:449:26)
make[1]: *** [node_modules/.bin/marked-man] Error 1
make[1]: Leaving directory `/home/ec2-user/node/npm’
make: *** [man/man3/npm-start.3] Error 2
Ignore my post; the version of node was too old!
Thanks for sharing articel
Hello. I’m wondering why do you have 2 instances, one for the api and one for the database? Would it hurt to have the app and the database on the same instance?
Thanks for the great tutorial. I have a question: In the inbound rules, where do I add the custom port?
This is so great. It helped me a Lot!!!!!!.
Somehow managed to screw up my sudoers file. Lesson learnt, always use visudo to edit your sudoers file, never edit it directly yourself.
This is a really good article that is still better than the official documentation on Amazon Website after all these years !!!
On a side note, do not use git to get nodejs but use “nvm”. You can get the latest version of node through nvm and make sure to install a LTS ( Long Term Support) version. nvm also make it possible to switch between different version of nodejs.
A little tutorial about installing nodejs : http://docs.aws.amazon.com/sdk-for-javascript/v2/developer-guide/setting-up-node-on-ec2-instance.html
I love this graphic for API. I found on a different website, but forgot which one so I reverse image searched and yours seems to be the oldest and likely original. Appreciate the simplicity when trying to explain API to a non-technical audience.
Thanks Jill. Yep, hand-drawn by my own hand.