A Node.JS Application on the Amazon Cloud. Part 2: Adding a Database
In Part 1, we installed Node on an EC2 instance on Amazon Web Services (AWS). In this part 2 of the series, we’re going to add a second instance running the popular MongoDB database.
Installing a Database on AWS
Any self-respecting web application will also need a database, so lets install one on AWS that the application we develop can use to store its data – so where do we start ?
Which Database ?
Amazon Web Services provides several database options. You can run fully managed relational and NoSQL services.
Amazon RDS enables you to run a familiar MySQL, Oracle or SQL Server database engine while offloading database administration.
Amazon DynamoDB is a fully managed NoSQL database service that provides extremely fast and predictable performance with seamless scalability.
Amazon SimpleDB provides a non-relational service designed for smaller datasets.
Or developers can download and install NoSQL databases of their choice on Amazon EC2. That is what we will do next – we’ll install the increasingly popular MongoDB NoSQL database.
Choosing MongoDB
![]() Because we’re programming in Javascript, it makes sense to use a noSQL database that uses JSON to store objects directly, making our programming job easier. MongoDb stores JSON objects in a binary BSON format, but that conversion is hidden from the application programmer – we will use the Mongoose Javascript library for accessing MongoDB, and the arguments are normal Javascript objects.
Because we’re programming in Javascript, it makes sense to use a noSQL database that uses JSON to store objects directly, making our programming job easier. MongoDb stores JSON objects in a binary BSON format, but that conversion is hidden from the application programmer – we will use the Mongoose Javascript library for accessing MongoDB, and the arguments are normal Javascript objects.
10gen develops and supports MongoDB, an open source, high performance document-oriented NoSQL database. MongoDB shines because of its ease of use for developers. Whether you’re using it in a large-scale application that spans hundreds or thousands of nodes, or in a single-server application that has no need for scale, MongoDB is great for modelling the entities that underlie modern web-apps.
but how do we add a MongoDB database on AWS so that we can then start to build our web application ?
Installing Mongo DB on your Amazon AWS account
On the AWS marketplace at https://aws.amazon.com/marketplace, search for mongo

choose your AWS EC2 instance type (i’m using a t1.micro instance for my demo).


Now if you return to your AWS management console you will see your new instance has appeared, and now you can check the public DNS for it and SSH into it using vSSH, just as described in Part 1.
The data directory will have been set by the AWS marketplace install script to /data in the MongoDB configuration file /etc/mongodb.conf.
Security rules, and accessing your Database from your other EC2 instances
“By default, the instance starts up with a newly created security group and that group specifies that only access via port 22 (SSH) is allowed. In order to make MongoDB accessible to other instances, you’ll need to add an additional rule to your security group specifying access to port 27017 along with a source Start by logging in to the AWS EC2 Management Console and navigate to the Security Groups section. Next, find the group that was created when you created your instance and add an Inbound Rule:
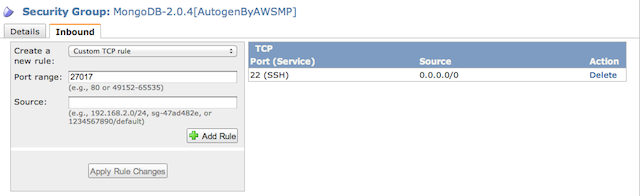
Set Port to 27017, and set Source to the security group of your other instance you want to access this database from.
This will ensure that only your app servers have permission to connect to your MongoDB instances.
After the rule is applied, you will then be able to access MongoDB running in your instance from the source instances you specified. Check out the AWS EC2 Security Groups documentation for more information about configuring access to your instance with security groups.
Advanced settings for MongoDB on AWS EC2
For advanced topics such as multi-region availability and data backups, see also the tutorial on mongodb.org site here Install mongoDB on Amazon EC2
Set up a Billing Alert
Billing alerts automatically notify you whenever the estimated charges on your current AWS bill reach a threshold you define. They’re useful to avoid any nasty shock when you get the invoice at the end of the month. Even if the free usage tier applies to your primary EC2 instance, your MongoDB instance is chargeable, so you’ll want to keep a close track of costs.
On your Account Activity page, click “Enable Monitoring”

Some next steps
End of Part 2
I hope this guide was useful. If you have any comments, suggestions or additional tips that could be added to the guide, please let me know in the comment section.
Next, in Part 3 of this tutorial, we will create a “Hello world” web server with NodeJS, Express and MongoDB.

Is it possible for me to use PostgreSQL instead of MongoDB and retrieve information using node.js ?
sure, though using an SQL database is very different to using a non-relational database like MongoDB. SQL can work well in Node.js, but less simple as you run into a problem because JavaScript language’s objects are dynamic without fixed structures. http://news.dice.com/2012/07/16/sql-vs-nosql-which-is-better/
Is there any reason why we couldn’t install mongo via ssh console on the first EC2 instance along with node and this way not having to pay for the second?
I have the same question. I can only guess that this way some things are taken care of for us or are easier to do (backups?).
I have followed your steps but i am not able to connect the mongo db instance.I am getting this error failed to connect to instance
Thanks for this article. This is useful. I am new to this node.js and mongodb. I created database and collections in my local development and I want to move my mongodb database (collections) to aws EC2 instance like you mentioned above. Please let me know how do I acheive this